The 15 pin joystick gameport on a PC is a sophisticated anolog-digital converter capable of monitoring a variable resistance between 0 and 100,000 ohms.
Using this port and visual basic it is possible to create powerful, graphic applications to monitor temperature, light levels, motion, stress and any thing that can be monitored with a changing resistance.
To use your gameport with Visual Basic you must install a joystick control. There are many available on the internet as shareware or freeware.
Download the Mabry Joystick Control from: http://www.mabry.com/joystk/index.htm
If the above URL has changed, search the Mabry site for their Joystick control at: http://www.mabry.com
After downloading, run the self installing file. This will load the needed controls in Windows/system
Using the Joystick Control
1. Connect a joystick to your computer.
(Must be installed in Control Panel)
2. Start Visual Basic (5 or 6)
3. "right click" on the toolbox - select "components"
4. Select the "controls" tab.
5. Scroll to Mabry Joystk Control, tick the box.
6. A Joystick control should appear in the toolbox.
7. Add a Joystick control to the form. ("double click")
8. Add two text boxes to the form.
9. Double click on the Joystick control (open code window).
10. Select "move" in procedures/events box ("button down" and "button up" are the other options).
11. Enter these two lines of code to "read" the x and y axis of the joystick:
Text1.text = X
Text2.text = Y
12. Run
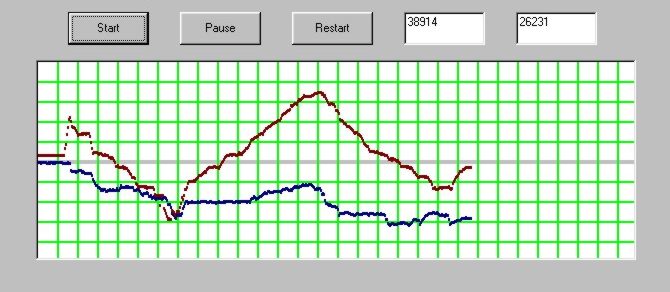
As you move the joystick, the numbers displayed in the text boxes will change with the motion.
Your computer is measuring and displaying the resistance created by your joystick. Replace your joystick with a thermistor and you are measuring temperature. Replace your joystick with a photo resistor (CdS cell) and you can create a security system or precision race timer.
Check out the Computer Engineering projects for information on making the connections.
This screen capture shows the display generated by VB
code monitoring the two resitors connected to the gameport.
Download source code (VB 5) to create basic graph as above:
Select "save to disk" when prompted.
Important: calibrate your joystick in "control panel".
The code:
Here is the code used to generate the above display
"grid" is a subroutine used to generate the grid.
The form requires three command buttons, two text
boxes, Maybry joystick control and one picture box.
Call grid ' calls subroutine
that produces the grid
Joystk1.Enabled = True
End Sub
Joystk1.Enabled = False
End Sub
Joystk1.Enabled = True
End Sub
Width = Screen.Width * 0.75 'sets form
to 75% of screen
Height = Screen.Height * 0.75
Left = (Screen.Width - Width) / 2
' centers form
Top = (Screen.Height - Height) / 2
End Sub
Text1.Text = X
Text2.Text = Y
Picture1.PSet (c, X / 250), QBColor(1)
Picture1.PSet (c, Y / 250), QBColor(4)
c = c + 1
If c > 600 Then Picture1.Cls
If c > 600 Then Call grid 'calls
procedure "grid" produces lines
If c > 600 Then c = 0
End Sub
Y = 20
For n = 1 To 9
Picture1.Line (0, Y)-(600, Y), RGB(0,
255, 0)
Y = Y + 20
Next n
Picture1.Line (0, 99)-(600, 99), RGB(200,
200, 200)
Picture1.Line (0, 100)-(600, 100),
RGB(200, 200, 200)
Picture1.Line (0, 101)-(600, 101),
RGB(200, 200, 200)
X = 20
For n = 1 To 29
Picture1.Line (X, 0)-(X, 200), RGB(0,
255, 0)
X = X + 20
Next n
End Sub