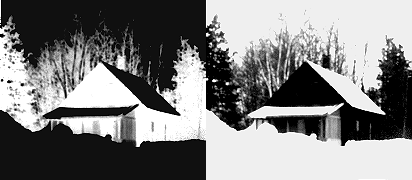
House in winter, pinhole picture, 45 seconds, bright sun.
Technology Workshop
Pinhole Camera
Series of images showing construction.
Modern cameras use a lens to focus an image onto light sensitive film. Early cameras used a "pinhole" in place of the lens. A tiny hole (less then 1 mm), focuses light passing through it, much the same way a lens does.
In this project you will construct a camera that uses a pinhole to create an image on photographic paper.
House in winter, pinhole picture, 45 seconds, bright sun.
Materials
- 1 sheet heavy black card, minimum 40 cm x 40 cm (Use heaviest Bristol board)
- black vinyl electrical tape
- small piece of aluminum (cut from cookie sheet)
- white glue
- pin (#6 needle)
- small piece of fine sandpaper
- photographic paper, developer and fixer.
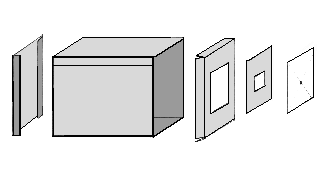
Pinhole Camera Parts
Body
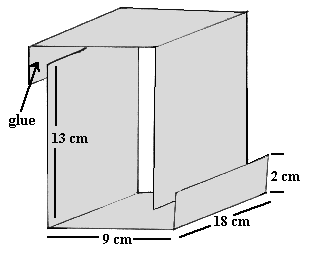
- Cut two pieces of black card, 18 cm x 24 cm.
- Fold cards as shown.
- Glue two halves together to form a box.
Film Holder
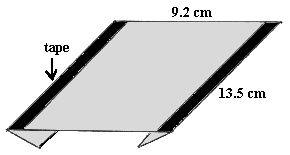
- Cut one card 9.2 cm x 13.5 cm.
- Cut two cards 1 cm x 13.5 cm. (film guides)
- Tape cards together as shown.
- Tape finished film holder to one end of camera body. Tape three sides leaving the top open. Note the film guides fold flat against the film holder and are inside the camera body. The film holder extends .5 cm above the top of the camera body.
Camera Front
- Cut one card 13 cm x 17 cm
- Cut and fold as shown.

- Tape to front of camera.
Pinhole
- Cut card 7 cm x 9 cm
- Cut 1 cm x 1 cm opening in center of card.
- Cut aluminum 7 cm x 9 cm
- Mark diagonals on aluminum sheet. (Finds the center.)
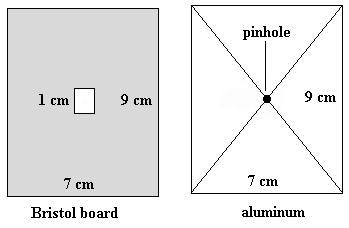
- Push pin through center. (Support aluminum so as not to bend it.)
- Remove burr around pinhole with fine sand paper.
- Darken area around pinhole with black marker. (This reduces reflection.)
- Tape aluminum to front of camera with black card "sandwiched" between it and the camera. Make sure the pinhole is over the hole in the card. The purpose of the black card is to reduce reflection from the shiny aluminum.
Loading the camera
- All these steps must take place in a dark room under a safe light.
- You need a piece of Black and White photographic paper
3.5 x 5 inches.
- Attach a tab of tape to the back side of one end of the photo paper.
- Slip the paper into the film holder on the camera. Make certain the sensitive (shiny) side of the paper is facing the pinhole. Leave the tape tab exposed at the top of the camera.
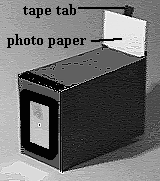
- Tape the film holder opening shut with black vinyl tape. Make certain that no light can enter around the tape.
- Place a small piece of tape over the pinhole.
Taking a picture
- Sit the camera on something steady pointed at the subject for your picture. If it is windy place a small weight on your camera to keep it from moving - your camera must not move while the picture is being taken.
- Remove the piece of tape from the pinhole and start timing. Remove the tape carefully - don't bump the camera. Here are some guidelines for taking your first picture.
- Bright sunlight: 45 seconds
- Very bright, hazy: 60 seconds
- Bright, cloudy: 120 seconds
- After timing the exposure, place the tape over the pinhole and return the camera to the darkroom.
After developing the picture, make exposure adjustments based on how bright or dark the final image is. If it is too dark then decrease the amount of exposure time. If it is too light then increase exposure time.
Equipment and supplies for developing black and white pictures are
available
from many photographic stores. Staff in these stores are usually very
knowledgeable
and will help you get started. Look in the yellow pages or Internet
under photography
supplies for a store near you.