Hila Science Camp - Technology Projects
Electromagnetism
Hila Science Camp - Technology Projects
Electromagnetism

Background:
A magnet is a device with the ability to attract iron*, cobalt and nickel. One end of a magnet is attracted to the earth's north pole, this end of the magnet is called its north pole. The other end of the magnet is called its south pole. The opposite poles of two magnets attract, the like poles of two magnets repel.
* (Magnets are attracted to steel because the main component of steel is iron.)
Electricity is a flow of atomic particles called electrons. Electrons will flow easily through most metals. Electrons travel from the minus end of a battery and are attracted to the plus end. Electrons traveling through a wire, create a weak magnetic field around the wire. Electrons traveling through wire, coiled around an iron nail cause the nail to become a magnet. This device is called an electromagnet.
PROJECT #1: Build an electromagnet
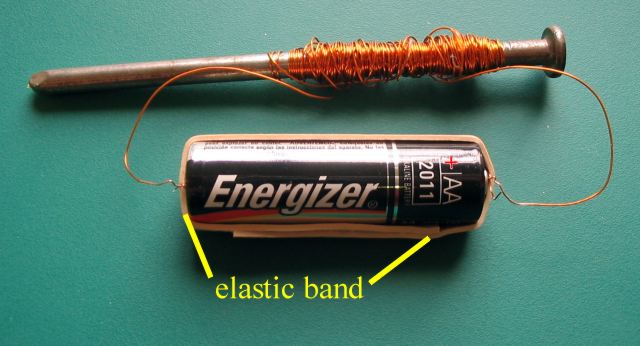
The elastic band holds each end of the wire against the battery terminals.
Only use a 1.5 volt AA battery with this electromagnet.
Only remove the insulating enamel from the last 1 cm of the wire.
Removing too much insulation could cause a short circuit if the bare wires
twisted together.
A short circuit would cause the wire to get very hot.
Your electromagnet will get warm, this is normal.
Supplies:
- 5 meters of magnet wire (24 to 30 gauge, Radio Shack #278-1345)
- 4" common nail (Canadian Tire # 61-5311-4)
- AA battery
- small piece of medium sandpaper
Assembly:
Wrap all of the wire onto the iron nail leaving about 10 cm of both ends of the wire exposed. Be careful to wrap in the same direction from beginning to end. Magnet wire is coated with a special enamel coating. This insulation must be removed from both ends of the wire to allow a metal to metal connection with the battery. Fold a small (2 cm square) piece of sandpaper over the end of the wire and sand, by pulling the paper, about one cm at each end. The colour of the wire changes as you expose the copper metal under the insulation.
Before connecting your electromagnet to a battery, test it to see if it attracts iron. Bring the tip of the nail close to some paper clips, metal paper clips usually contain iron.
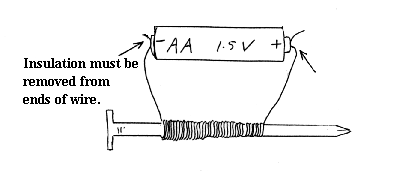
Now connect your electromagnet to a battery, one wire touching the minus end the other touching the plus end. Use an elastic band pulled over your battery to hold the wires in place. Your electromagnet should now strongly attract metal paper clips.
My electromagnet doesn't work!
- The most common problem is poor sanding - make sure that both ends of the wire have all of the enamel insulation removed.
- Make sure you are using a good battery. Rechargeable batteries are excellent.
- Do the metal objects you are testing your battery on contain iron? Test them with a permanent magnet.
Safety:
- Use only a 1.2 to 1.5 volt battery (such as an AA) with this electromagnet. Higher voltage batteries will cause the electromagnet to overheat. An AA battery will cause your electromagnet to get warm, this is normal.
- If you have sanded too much of the wire they could twist together creating a short circuit, causing the wire to get very hot, even with an AA battery.
Going Further:
- Use a compass to determine which end of your electromagnet is the north pole. Reverse your battery connections, has this changed the north pole?
PROJECT #2: Simple Speaker
Speakers are found in electronic equipment such as radios. A speaker is a device that converts electrical energy into sound energy. Most speakers employ two magnets to accomplish this - an electromagnet and a permanent magnet. Electrical signals from a radio drive the electromagnet creating a fluctuating magnetic field. This magnetic field pushes and pulls on the permanent magnet causing vibrations that create sound waves.
Supplies:
- 3 meters of magnet wire (24 to 30 gauge, Radio Shack #278-1345)
- an empty film canister
- one ring magnet (Radio Shack #64-1885)
- masking tape and small piece of sandpaper
Assembly:
Wrap the magnet wire around the base of the canister. Secure wire in place with tape, then sand both ends to expose the copper metal. Tape a permanent magnet into the bottom of the canister. Attach the two leads to the speaker connectors of a suitable, low power radio. Tune the radio and set the volume to mid-range, you should hear sound coming from your speaker. If you are not sure about connecting this to a radio, find someone knowledgeable to help you, incorrect connection could damage your radio.

Caution, do not connect this speaker to a powerful radio or stereo, you may damage the radio!
Going Further:
- If you have a broken radio or other device that uses a speaker, remove the speaker and see if you can find the electromagnet (coil) and the permanent magnet.
PROJECT #3: Simple Motor
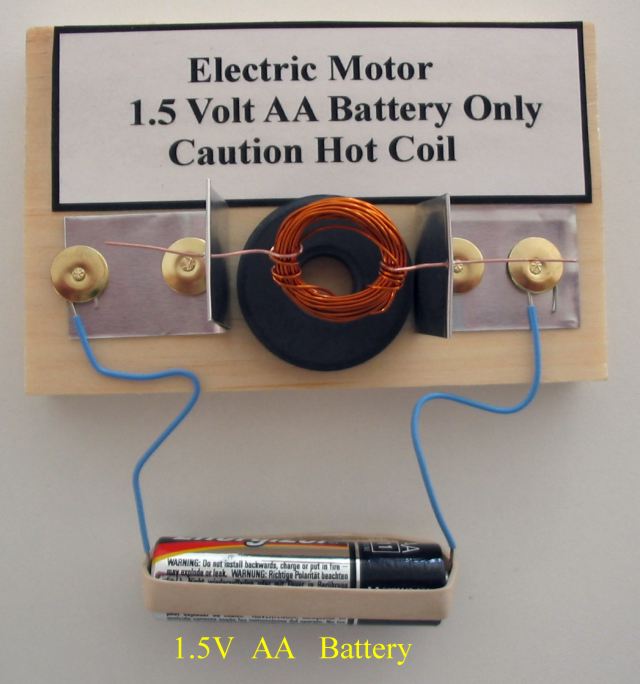
It is important that your coil is as symmetrical as
possible.
Make sure the two wires extend from the coil on opposite
sides.
Disconnect your battery for 1 minute before touching
the coil.
The coil might be hot.
Electric motors are used in tape recorders, toys, robots and thousands of other appliances and tools. A typical battery operated electric motor uses both permanent magnets and electromagnets. The magnets are arranged such that one magnet "chases" the other magnet in a circular motion.
Supplies:
- 2 pieces 2 cm X 6 cm of thin aluminum (cut from thin aluminum cookie sheets)
- 1.5 meters of magnet wire (24 or 25 guage, Radio Shack #278-1345)
- 2 metal tacks
- 2 lengths copper wire, 15 cm (Radio Shack #278-1306)
- 1 ring magnet (Radio Shack #64-1885)
- 1 AA battery (Do not use any battery rated above 1.5 volts, overheating of coil will result)
- 1 block of wood, 6 cm X 15 cm
- small piece sandpaper, 1 elastic band.
Procedure:
Wind the magnet wire around the battery to form a ring. Leave 6 cm of each end extended. Carefully slide the coil of wire off of the battery. Wind the two ends around the coil three times, they will hold it together. You should have 2 cm of wire sticking out each side of the coil. Sand all of the insulation off of these two ends. Make sure the two wires extend from the coil opposite the centre.
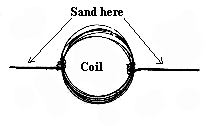
Bend aluminum strips to size and shape indicated on drawing. Push a pin through the centre of the folded end as indicated on drawing. Use thumb tacks to pin these two brackets to the wood block. Make sure the magnet will fit easily between the brackets and connect the two battery wires as shown (make sure the plastic is removed from each end of the battery wires).
Slip each end of coil wires into pinholes on aluminum brackets. Place magnet underneath coil. Connect battery to wires using an elastic band. The coil should attempt to turn, give it a gentle spin to start it.
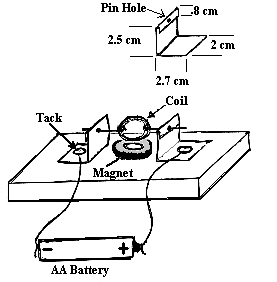
The coil will get hot, disconnect battery and let it cool before touching.
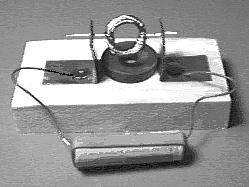
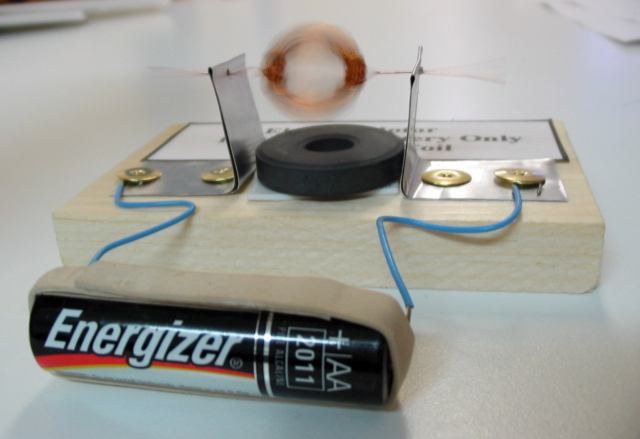
Finished Motor
My motor won't work!
- Check the sanding on your coil wires. Both wires should be bare metal. If your coil is not hot then more sanding is needed, you need a new battery or the battery wires are not connected properly.
- Make sure your coil is balanced and that your brackets are solid.
- A freshly charged battery is important.
Going Further:
- Experiment with adding more magnets to your motor. Does this improve it's performance?
Projects developed by Carol and Wayne Campbell, Hila Science Camp
Comments? e-mail: hila@hilaroad.com